Use Stack directly as a backup destination in Synology Hyper Backup.
February 4, 2018•599 words
Note: Stack no longer works. I currently use Hetzner as a backup location. They have a product called storage box. It supports WebDAV and they have different options. From €9,56 for 1TB up to €48,28 for 10TB of storage. Which brings it down to €4,83 per TB per month. It’s fast and reliable. Using it for some time now and it’s definitely worth the money.
Synology Hyper Backup can backup to WebDAV servers. Stack has support for WebDAV but They don’t seem to like each other. If you follow a few Dutch forum threads (1 2 ). Users mention that the use of Sparse files is the problem. Hyper Backup creates a Sparse file in WebDAV backups in nas_1.hbk/Pool/bucketID.counter.1
The filename tells us that it’s used as a counter. After creation of the backup task it seems to be empty (I tested this with another WebDAV server !). If we manually try to upload this file to Stack we receive an error. “Method not allowed”
So, let’s see what is actually in this file. Well it’s empty…
gijs@Carbonite:~$ hexdump -C bucketID.counter.1 00000000 00 00 00 00 00 00 00 00 |........| 00000008
After creating the backup task, this file is empty but as soon as the backup runs the file will be replaced with another one. When I check the contents of this new file it was not empty.
gijs@Carbonite:~$ hexdump -C bucketID.counter.3 00000000 00 00 00 00 00 00 01 5e |.......^| 00000008
Uploading this new file is accepted by Stack. Below I will guide you through the steps to get Hyper Backup use Stack as a backup destination.
Step 1: Have another WebDAV server
Before we can create a backup to Stack we need a separate WebDAV server that supports the use of Sparse files.
This can be remote or local with the WebDAV server package.
I choose to use the local package.
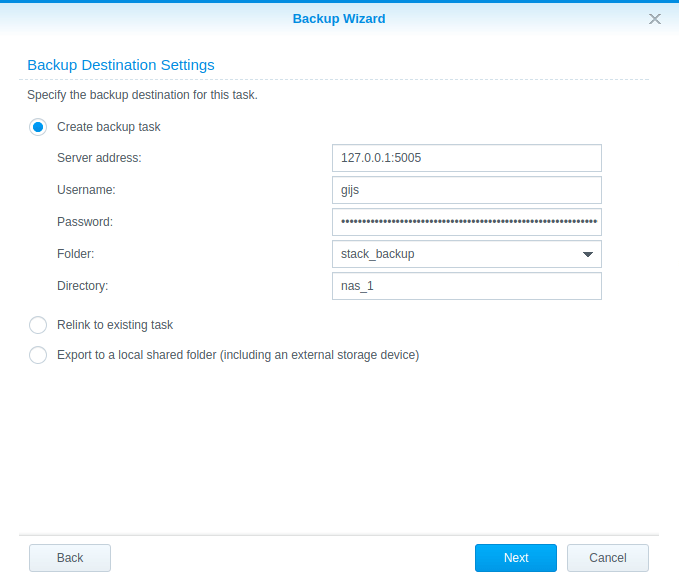
Step 2: create a WebDAV backup task to this server.
Create a new backup task and select the server from step 1 as the destination.
- The server address should be the address of your WebDAV server (in my case the Synology itself)
- The folder needs to be the folder you like to use on Stack (you may need to create a temporary folder on your WebDAV server.)
After clicking Next you can choose the folders you want to backup and all the options you like to use. It’s not important for now so I don’t cover it here.
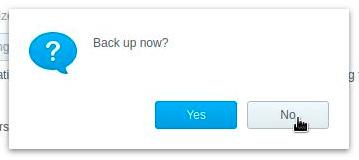
Hyper Backup will ask if you like to create a backup now. Click NO.
Step 3: Copy files to Stack
Upload the complete nas_1.hbk directory to Stack in the folder with the same name as in step 2. Stack will not accept the file nas_1hbk/Pool/bucketID.counter.1 but you can skip it.
In my situation my folder in Stack was: stack_backup > nas_1.hbk
Step 4: Edit the backup task
Go to your Stack settings page and copy the WebDAV url: https://YOUR-STACK.stackstorage.com/remote.php/webdav/
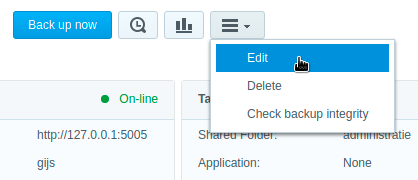
In Hyper Backup: Edit the backup task by clicking on the menu and then Edit.
Open the Target tab and replace the current values with those from your Stack account.
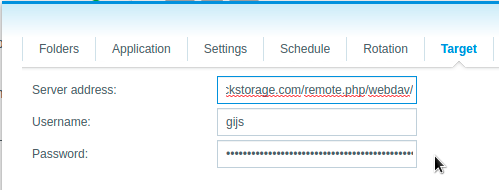
Click OK and Hyper Backup will recognise the backup task at your Stack storage !
I have tested the following and they all work fine:
- Initial backup (17GB)
- Adding a file and doing an incremental backup
- Recovering 1 file
- Recovering the complete folder (17GB)
Note: Having a decent backup plan is important. Test your backups and have multiple destinations. Also Off-line.